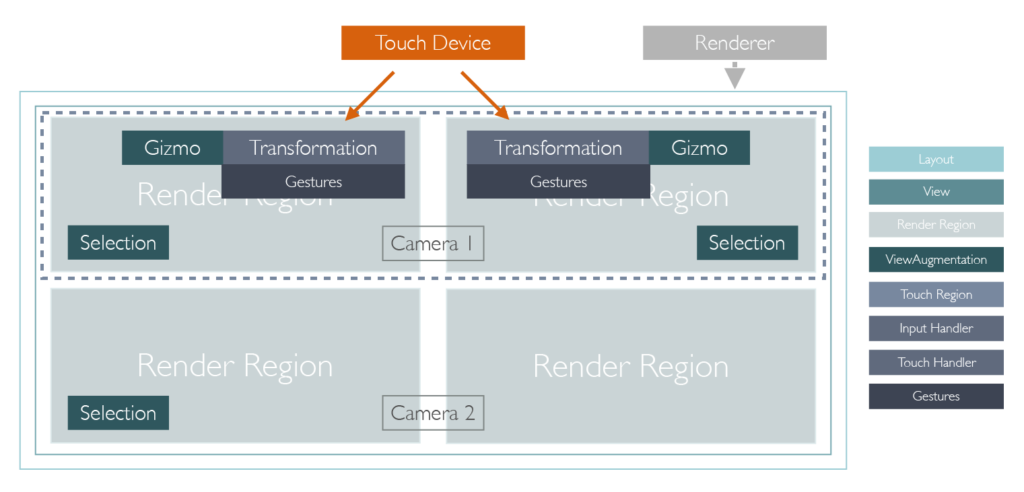
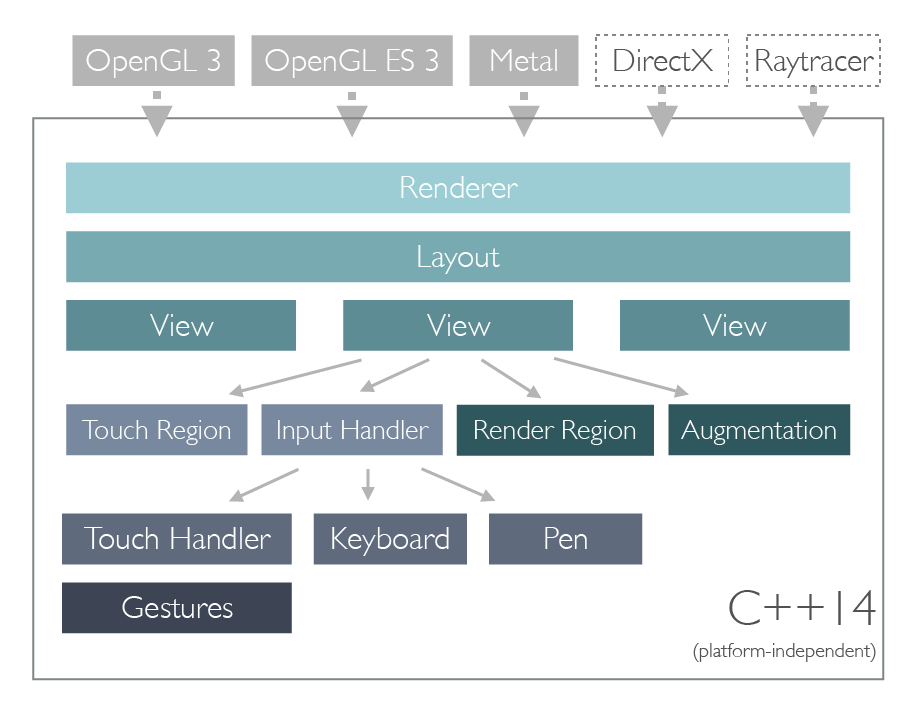
The render layout sub-system in Core SDK is one of its central features. It helps compose multiple views or multiple output displays to a single consistent layout and is one of the reason why the SDK is so versatile. But it also helps managing input mapping and other aspects such as stereoscopic VR/AR rendering. Here is how:
Render Layout & Views
When using the SDK for rendering, the render layout is the highest-level element of organization. Most apps will typically only use a single layout but multiple layouts can be switched on the fly as well. A layout contains one or more views that are positioned in the pixel space of the render layout. For most use cases, a single view represents everything that is needed for an application: each view has its own active camera, a reference to a scene, its own set of view augmentations and input handlers.
So why should one use multiple views in a single layout? A view can either be used to show the same scene from a different camera (e.g. a top and side view simultaneously) or show multiple scenes on a unified render surface (e.g. comparing two parts). Each view can also have independent view augmentations.
A view augmentation is a mechanism to add elements to the rendering without having to modify the user’s scene data or hard code rendering passes in the render-backend. Examples are the selection highlight, normal visualization or the transformation gizmo. The latter is particularly interesting because a transformation gizmo consists of two parts: the rendering and the input handling. In Core SDK this is done by two classes that communicate with each other: A view augmentation and and input handler.

Input Mapping
An input handler receives input events (mouse, keyboard, touch, pen, etc) from the render layout and performs some actions. For example, the SDK contains multiple implementations that represent different forms of navigations. For example, one input handler might interpret key strokes as a way for the user to fly through the scene, another might interpret mouse movement to do an arc-ball rotation around the object. In case of the transformation gizmo, the input handler listens for touch events and figures out whether the gizmo itself or some other part of the scene was hit. To make things easy, the handler does not have to interpret raw touch data but can use the included gesture handlers as well. A gesture handler (such as the tap, drag or pinch gesture) interprets multi-touch event and translates them into easier to use events and values (e.g. an start pinch / end pinch event and the amount of pinching).
Did you notice how we said that the input handler receives the input events from the render layout? It does not receive it from the touch device itself. By using touch regions, the application can define to which portion of the render layout the touch device is mapped. In the example shown above, the touch device is not directly connected to the displays but actually is an external hardware that covers the complete top row. Since the render layout know where each view and the touch regions are, it can automatically map coordinates such that the input handler correctly works inside it’s parent view’s own confines.
Rendering Sub-Segments
Finally, a single view can be split into multiple render regions, which are sub-regions of a single view. If multiple render regions share the same camera (e.g. for using a wall of displays), the system automatically calculates the correct shearing matrices for the render backend to render that segment of the overall image correctly. Render regions can also be used with separate cameras to support side-by-side stereoscopic rendering such as in VR/AR devices. The advantage of using render regions is that there is a single view-definition and a single camera to move in the scene (i.e. where the user stands and the orientation he looks at), but the render regions can have individual cameras that are linked to the scene’s camera but offset by the interpupillary eye distance.
Implementing the Rendering Backend
As most parts of the Core SDK, the render layout is total agnostic to whatever render backend is used. In fact, it does not even know that the Renderer class exists. Instead, it is up to the render backend to use the information stored in the render layout to produce the correct output.
At first glance, that might sound like a lot of work for each render backend. However, the render layout and view do all the heavy lifting. Whenever a view is moved or the layout itself is resized, they will automatically update their output rectangles and provide new, updated view and projection matrices. These are based on the active camera of the view but take into account any shearing that might be required to do multi-segment rendering due to the usage of render regions.
Essentially, a renderer just has to make sure that its render surface is big enough for the whole render layout, then:
- clear it once at the beginning of the frame
- iterate over all views/render regions, for each region:
- turn on a clip region/viewport to ensure only the portion for the current region is rendered to
- apply the view / projection matrices provided by the view (and not the camera itself)
It is up to the render backend to decide if it is more efficient to use one big render surface and use clipping or use multiple individual surfaces, one for each segment. Depending on the techniques and APIs used, the latter might be more efficient but in other scenarios (such as when post-render effects such as glow are used) it makes more sense to use a single surface.
Summary
In summary, using render layouts and the dependent classes provides a highly flexible system to cover wide variety of use cases. Regardless of whether you work in a side-by-side rendering for VR or a multi-display wall, the render layout takes care of mapping input and calculating the correct projection matrices for you.


Leave a Reply