Shadows add a lot of realism to renderings. After having done a lot of internal refactoring and ground work for future features, I wanted to add something that improves the image quality but doesn’t delay too much from the actual topics I have to work on. Hence the idea of adding a simple, pre-baked ground shadow.
I haven’t integrated a ray-tracer yet so doing proper global illumination was out of the question and I also – for a variety of reasons (coding time, algorithm complexity, rendering speed, memory consumption, …) – didn’t want to implement some form of real-time shadows (cascading shadow maps most likely) just yet. So instead I opted for something straight from the ’90s: doing a orthogonal projection and blurring it a bit. Of course the devil is always in the detail and while it was reasonably quick to get some form of shadow, it didn’t look as nice as I wanted to be. So here is the slightly improved version I came up with:
Basic Algorithm
We are not aiming for a “correct” shadow but just something that looks plausible and is easy to generate. So the basic algorithm is a pre-processing step which is done once when loading the scene (or re-done if the user for example changes from Y-is-up to Z-is-up, moves the main light source, etc). It works in multiple steps:
- Use the light direction to figure out a 2D bounding box of the shadow in the ground plane.
- Calculate an orthogonal projection matrix that is looking up from the ground and is sheared towards the light source.
- Render the dept buffer to an image & desaturize/blend
- Blur the image
- Apply the image to a quad and position it in such a way that the image matches the projection
Lets go through each step in detail.
Step 1 – Light Direction and bounding box.
This is rather trivial as the 2D bounding box doesn’t have to be optimal. It just needs to be a rough, conservative approximation. The first important thing is to limit the elevation angle of the light because if the light direction is too shallow, the projected shadow will be huge and the texture resolution will not suffice.
The 2D shadow bounding box is calculated by figuring out the up-direction (e.g. Y-is-up or Z-is-up) and then taking each corner of the scenes content bounding box and projecting it into the plane. Calculate the bounding box over the projected points and that’s it.
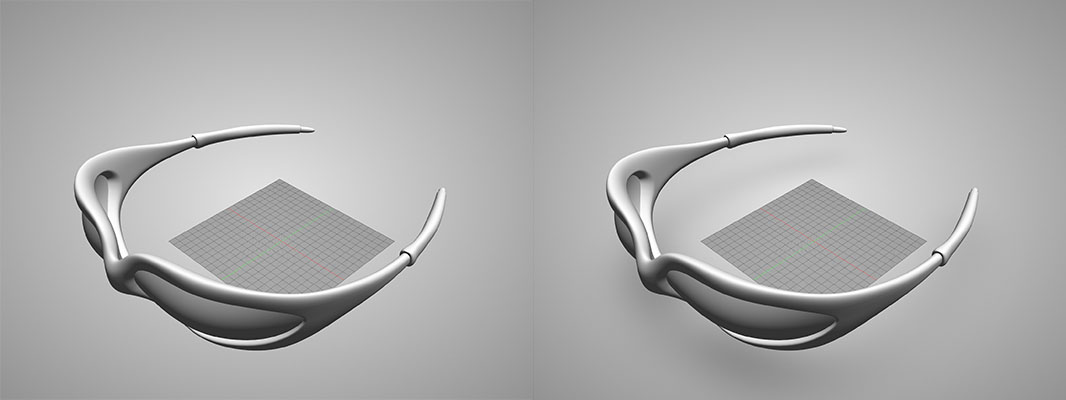
Step 2 – Calculate Camera
Once the 2D shadow bounding box is calculated, we can derive a couple of things:
- The camera position is the center of the 2D bounding box
- The camera orientation is “up” (whatever that is in your coordinate system)
- The camera aspect ratio is the aspect ratio of the 2D bounding box
- The top/bottom/left/right frustum planes are set to align with the edges of the 2D bounding box
- The camera’s shearing is set to match the inverse lighting direction
I set the clip planes such that the near plane is just below the shadow plane and the far plane is 10% above the top of the bounding box. The reason why it’s not exactly the top will become obvious later on.
\( M_{orth} = \begin{bmatrix} \frac{2}{r-l} & 0 & 2 \cdot {shear}_x & -\frac{r+l}{r-l} \\ 0 & \frac{2}{t-b} & 2 \cdot {shear}_y & -\frac{t+b}{t-b} \\ 0 & 0 & \frac{-2}{f-n} & -\frac{f+n}{f-n} \\ 0 & 0 & 0 & 1 \end{bmatrix} \)Step 3 – Render the Depth Buffer & Desaturize/Blend
My first attempt simply used the color buffer and then set the color of each pixel to black, just preserving the alpha channel. However, it seemed weird to have parts of an object that are far away from the ground plane to cast the same shadow intensity as objects that are just above it. So I now use the depth buffer and use the depth value (which is linear for orthogonal projections) to blend between a 50% opaque black and a fully transparent pixel.
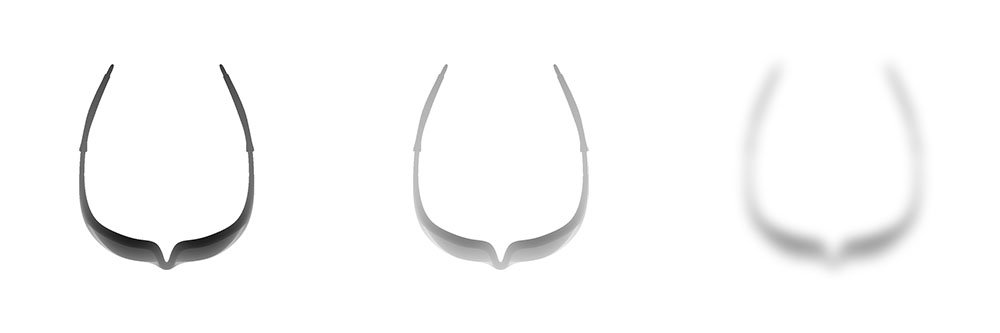
One interesting detail is that using a quadratic blending function produced much nicer results as directly using linear blending. Also it seems to help to add some space in the frustum above the bounding box as otherwise triangles that lie on the top rect of the bounding box will produce no shadow at all (e.g. imaging a cube, the top face would align with the far plane and thus produce a Z-value of exactly 1.0).
Step 4 – Blur the Image
Hard shadows always look to harsh, so I found a fast CPU-based convolution blur algorithm and implemented it. In order to not blur over the image boundaries, one can either enlarge the 2D shadow bounding box before calculating the camera or later extend the depth buffer image.
Step 5 – Add Textured Quad
Finally, we add a quad to the scene which is placed/oriented to match the 2D shadow bounding box and use the blurred image as a texture.
Conclusion
As I said, this is pretty much straight from the ’90s. However, now that I figured out all the 3D math it would be easy to do it completely on the GPU and have it update every frame instead of on the CPU and only pre-bake it. Another idea is to do something similar to create a cheap, blurred ground reflection. But in the end, it was just fun, looks nice, is quick to render… and will probably be replaced by shadow maps soon… : )
Leave a Reply